Revell Me-410B-2/U4 w/Aires detail sets


Not sure how or why this one popped out of the stash pile.  I’ve fondled its fine styrene lines a few times from the box and I even had the Aires cockpit set in the aftermarket box.  This is the Revell version (not Promodeler) and is the version with the 50mm cannon; a bomber buster.

I decided to build up the fuselage first, starting with the resin cockpit.  It is a very nice set and replaces an okay cockpit from the kit.  But you can see from the kit detail compared to the Aires detail, it adds a lot (even though most of it you can’t see after you button it up.

vs.

The cockpit is made up of a rear gunner section and a forward cockpit including details like seat cushions and a photo-etch set for instruments, seatbelts, and levers.  Here they are all painted up looking pretty good.  The cockpit was painted with Vallejo Model Air, sealed with Future, and weathered with oils and pastels.  Chipping and details were painted with a mix of paints, mostly Testors enamels.

It took a little sanding down of the resin parts to get it to fit and once it was at the right place the cockpit just slid into place.


The method I used was to glue the fuselage together and then push the rear cockpit into the fuselage.  The backend of the top of the cockpit has to go into the fuselage so that the raised feature is aligned with the beginning of the top of the fuselage.  A certain part of the Aires cockpit top needs to go back into the fuselage.  Like this

It took me a while to figure this out.  Once that is done you can glue the front part of the cockpit to the top of the cockpit and it should all fit nicely.  I used the front window of the fuselage to ensure the fuselage would close up properly and the rest of the parts like lower gun covers and cockpit glass would fit.  And you can see here they do.

Next up is completing the cockpit by finishing the cockpit roll bars, rear gun site, masking the canopy, and gluing that into place, then we will start with the wings and the Aires engine set.

Ancient Airfix 1/72 Fi-156 Storch

Once upon a time many moons ago there was a kid who was excited to use his lawn mowing money to buy a kit from a (now long gone) hobby shop in Chicago called AL’s Hobbies of a 1/72 Fi-156 Storch.  It was really cool in those day to have access to “overseas” kits, as the local stores only carried the Aurora/Monogram/Revell US brand, and this kit was an Airfix kit from Europe.

That kid was me and I have carried this kit in the special kit storage area since those days.

A few years back I was able to buy a copy of this kit, so I could build one and preserve what is probably my second oldest kit in the collection.  This is my experience with a very old kit.

The kit is actually very interesting for the options included.  It has a stand, which was prevalent in those days, and includes the additional parts to build it in flights.  While the aircraft was in flight the oleos of the landing gear fully extended and this is represented in additional parts if you want o build it on the stand.

There is no cockpit other than a couple of seats (if you can call them that, and a few attempts to represent an instrument panel and control stick.  I just blew by these as I figured out that they wouldn’t be seen and I didn’t want to devote a lot of effort to doing scratch-building.  (I’m saving my Eduard set for the Academy Storch).  Airfix did provide these small examples of a pilot and passenger “amputees” to paint up and stick in the seats but I was too lazy to take that on as well.

The kit built up fairly well.  There is some putty needed around the cowling and the clear part fit was very bad, requiring some sanding, fitting, and polishing to get it to a reasonable place.  The engineering wing attachments come off of the roof of the cockpit clear parts so it needs to be pretty secure as well.

Lastly, it is really hard to interpret the landing gear instructions.  It’s good these days to have the internet so I could go and look at some Storch pictures to see how the gear is intended to connect.  There is a tiny hole in the bottom of the fuselage that holds both rear landing gear pins and I needed to drill out a better attachment for the front of the gear legs.


Also, note the hole in the bottom for the stand but the stand connection comes expecting a slot.  I modified the stand to fit.

The kit was painted with Vallejo black acrylics with a bit of gray and blue added and decals were a great Owl set for a black Storch.  Sadly I painted up the kit all black and then discovered when I opened the decals that the top of the wing should have been in standard RLM splinter scheme, not all black.  Oh well!

Modeling is all about history.  It was fun pulling out a bit of my history and building a kit I’ve had owned for over 50 years!

Italeri H-34 Antarctic

This is the third Antarctic helicopter build in the collection, all based on the great decal set Antarctic Helicopters Part 1 from Max Decals.

The other two builds can be found in these posts;

https://dlloseke.wordpress.com/category/modeling/helicopter-modeling/

The kit went together reasonably well.  I wasn’t after super detailing but I did use some of the Eduard photo-etch set for the kit, mostly in the cockpit and rotors.

The cockpit and interior were detailed and painted up, but very little can be seen once the kit is buttoned up.  This is actually good because the inside of the kit is an ejection pin mark convention.  The Huey of this scale was more open and the H-19 at least had cockpit windows the could be shown open, for this kit I wouldn’t put a lot of effort into it.

I also decided to use the kits web backing for the interior seats as the Eduard etch has no details (and again, you really can’t see it buttoned up).

The etch however did come with a lot of mesh for those sections of the helo that was open up.  I cut out a lot of the plastic from underneath where the mesh would go so it would be open.  A super detailer might want to recess this a bit, but not on this build for me.

The ki was painted in international orange from my old bottle of Floquil paints (the paint brand of my youth).  The paint is getting old enough that it is hard to get the paint/thinner mix right, but the color looks nice.

After paint, helo was given a couple of coats of Future Floor Wax and decals applied a few days after the future cured.  The decals are pretty simple, markings only, and settled down nicely with an application of Solvaset.

Afterward a bit of weathering with a raw umber oil wash and then some pastels to grub it up a bit.  I think the end results look good and it looks nice next to its other Antarctic buddies.

Roden Be 12 Nightfighter

After a taste of WWI with the Fokker Dr1 in the previous post, I decided to step into the world of biplanes with a Be 12 I purchased off of eBay.

It has been an interesting experience.

First, this was the second time I bought a kit off eBay that looked complete until I went to build it many moons after the purchase.  In this case, I observed that part of the landing gear struts was missing.  A previous owner, maybe not even the guy I purchased it from, sought to tear a small hole in the plastic bag and take 1/2 of each of the landing gear struts off.  I can’t imagine what for, but they would have had to cut the back part of each strut off the whole piece to take it.  Odd!

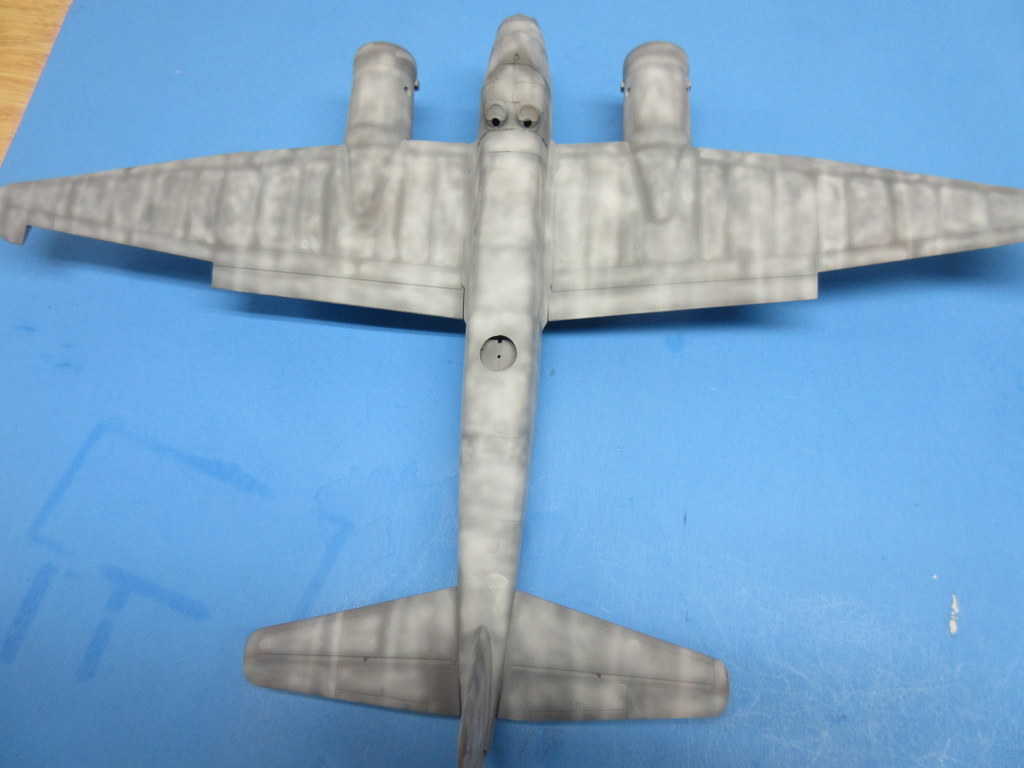
The kit is very detailed and consists of very soft plastic.  Any flexing of one of the soft parts could cause it to fail.  However, the kit had a lot of detail in some of its small parts and comes with a range of bombs and WWI rockets to use.  There were a lot of parts left over and I think Roden must have made these kits for a multiple of variants.

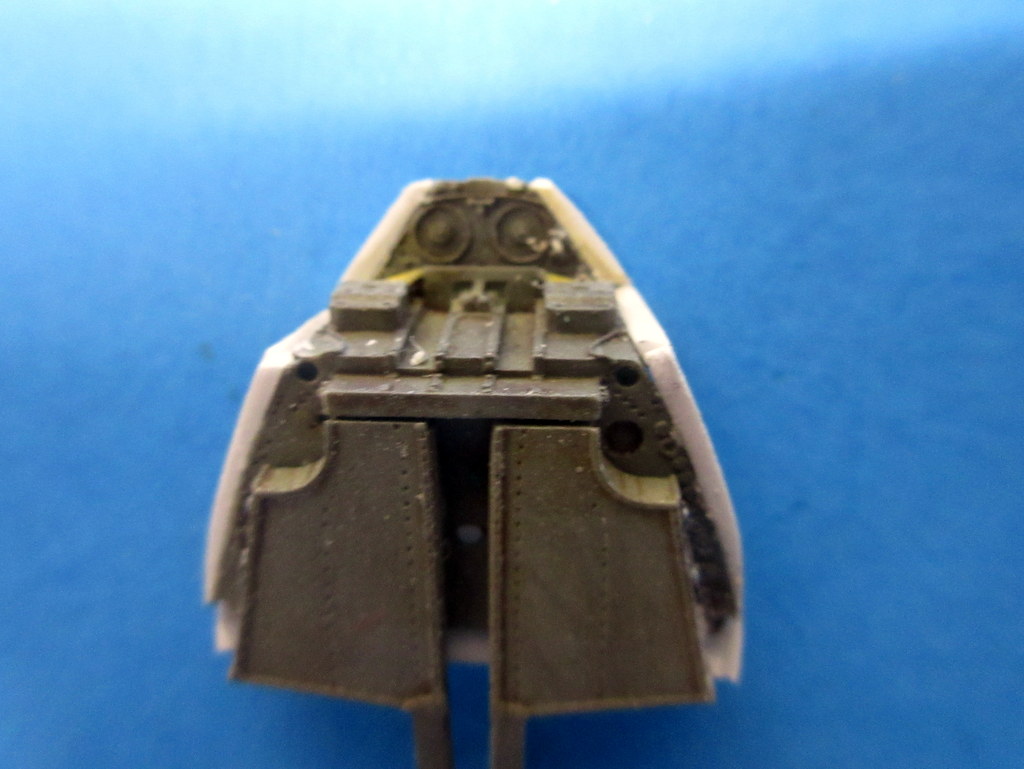
The cockpit is sparse and the instructions overall are very hard to determine just where parts go and what their orientation is.  I would recommend that anyone building this kit to have some form of reference to determine just what some of the parts are for.  Or course, this might just be my ignorance of WWI biplanes and how they operate.

The parts went together mostly well without too many gaps, the nose section being the exception.

You must be careful aligning since there are no pins or guides.  I actually moved to using superglue instead of Tamiya thin cement since the plastic was so soft the thin cement didn’t form a very good welded bond.

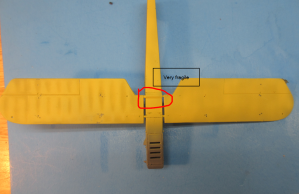
The lower wing fits into the fuselage and there are two small plastic sections that separate the fuselage from the lower wing, molded into the part.  One of these continuously failed (broke) and I needed to be very careful moving the fuselage/lower wing unit around as not to cause the lower wing to flex too much and break off.  It didn’t get secured until I finally got the top wing onto the part (more later).  Had I knew this beforehand I would have replaced the plastic connectors with tubing.

After building the kit (leaving the top wing off until last) I painted the top with Testors Marine Green (seemed close enough) and the bottoms with Humbrol linen, and the decals applied after a coat of future.  The decals did not respond at all to setting solutions and in most cases left very clear areas.

An oil dot weathering was then applied (blue, white, tan on top – brown below) and after a good coat of Testors Dullcoat things started looking a lot better.  I was pleased with the way the oil dot weathering diffused the solid green topcoat and the streaking on the linen color looked good.  I was pleased the decals blended more into the surface.

The next step was rigging.  I have built a bunch of sailing ship models all with complex rigging but this was to challenge for me.  I read an online article about drilling a hole through the lowering for each line and after fastening to the top wing, passing the line through the hole and attaching a weight (in my case a clothespin) to it to hold it in place while the drop of glue you put in the hole dries.  I added ALL of the lines to the top with before we put the wing on.

After rigging was set I created a small jig that matched the holes in the top wing with for the struts to the fuselage pattern, added the struts to the jig with a bit of white glue, and glued and aligned the struts and left them to dry.  The upper wing was then added to the fuselage struts, set to dry for a day,  and then the remaining struts to the lower wing were put into place.  All VERY delicately!

Rigging was then finished and some of the rigging holes were touched up.  Final parts like guns were then added and done!

This was a learning build.  I learned that the next biplane I build should have fewer rigging lines! I was amazed at what a complex kit this was and I have a lot of respect for those WWI biplane builders.  But I am very satisfied with how it turned out, especially the paint job.  Now back to those more modern types for a bit!

DML Fokker Dr.1

First build started and finished in 2020.  The DML Fokker Dr.1 is a pretty simple build and after the Ju-88 of the previous, quite small in comparison.

The tiny fuselage and cockpit are very simple and went together well.   Although a two sets of photo etch are included in the kit, it is very hard stainless steel and getting the harnesses to bend was difficult.


Before assembly I painted the aircraft in the Fokker streaked pattern.  To do this I painted the whole of the fuselage and wings Vallejo Model Master RML 78.  I don’t know if this is exact but it looked pretty close to the blue I wanted.

After that, a good solid coat of Future floor polish was put on the surfaces and after it dried a few days I used Model Master enamel “Marine Corps Green” to do the streaking.  A wide brush with a bit of paint of which I would dip the paintbrush in odor free mineral spirits and carefully streak the paint.  Too much, the spirits took off the excess.  I was pretty impressed by how easy it was.

Tail plane and places for the decals were then painted, decals on, and we started assembly.  I used the Eagle Strike Fokker Dr.1 Aces (48102) for markings.

The instructions for the top of the middle wing, where all of the guns go, was very unclear.  So I just put things in around where I thought they should go.

Overall a pretty easy stress free build for the first multi-wing aircraft I have built in a long time.


ProModeler Ju-88A

Please see the previous post for information on the Aires aftermarket cockpit add-on.  We begin construction from there.

After getting the cockpit completed I went to finish the rest of the kit.  I mostly followed the instructions with the exception of adding the glass and delicate things like antennas until after painting.

The kit requires you put together the engine nacelles with the landing gear inside.  No way to add the internal parts of the gear until after painting but I was able to leave off the end of the gear so it was easy to mask.

The other item left off was the front of the engine nacelles.  I did this so you can leave off the exhausts until after painting.  The big holes in the front of the nacelles also make good finger holes for holding the model while finishing!

The kit required some filling and sanding.  Especially at the wing tips which are separate parts.

The ailerons were also molded separate but I warn you don’t try to  model them up or down as the aileron hinges in the bottom of the wing won’t fit.

I wanted to do the desert markings with these neat squiggles in two different colors.

I have been successful before using blue tack as a masking device.  The idea is to paint the squiggle color, roll the blue tack into thin ropes, apply to the model, and spray over it.  Here is an example of a Bf-110 I did using this method.  It worked pretty sweet and  saved me from free-handing it.

In the case of the Ju-88, I don’t know what the issue was but I  suspect the blue tack sticks really good to Vallejo paint and I had a lot of trouble cleaning off the blue tack, to the point I  was destroying some of the painting.  If you look at the second photo  here you can see the embedded blue tack.

So I bit the bullet and started over.  I decided to pre-highlight the color starting with dark gray primer and then using an airbrush I gave areas a thinned coat of Vallego white primer.  I figured this was a desert craft and the resulting colors would need to be lightened somewhat.

This Ju-88 has quite the squiggle (Wellenmuster) camo on the bottom of the aircraft.  To complete this I purchased a set of fillable pens that I could put some of my Vallejo RLM70 into and basically draw the camo on the bottom.  Not perfect but pretty okay and it is on the bottom!  I think next time I  would try the .7mm pens instead of the 2mm tip.

Freehanding the camo on the upper was a bit of a challenge as I was having airbrush issues.  However, they were soon resolved and I am happy with the result.

After decaling and a coat of future we grubbed her up and added all of the other parts.  Shes a big girl on the shelf.

Since I have about another 4 of these 1/48 Ju-88s I learned a lot about putting them together.  Overall a decent kit with lots of details.  Add the Aires details and you have a winner.


Aires Ju-88A resin-etch set

I started the ProModeler Ju-88A around Christmas time so much of the work here was around the first of the year.

The parts replace the kit components in a very nice fit.  The set was painted with a variety of paint, mostly centered around Vallejo ModelAir.  After airbrushing with a slighly lightened mix of RLM66 I added a bit more white and highlighted some of the features.

After putting the cockpit together, including a nice set of harnesses, I fitted the cockpit section together and tested the fit.  The set required some size reduction using the old trusty belt sander but once cleaned up fit like a glove into the kit parts.

Normally to improve fit I would attach the sides of the front section to the sides of the rear section and  then glue the completed sides together but on this kit it made more sense to capture the cockpit details in a completed front section and then glue it to a completed rear section as I needed to make sure all of the front parts, including canopies, fit well.

There are other details in the set like the guns that will be added later once the kit is completed.  But overall I enjoyed building the cockpit.

I’ll cover the kit construction in the next installment.


Eduard Fw-190A-6 with Brassin completed

The Fw-190A-6 kit is complete.  I really enjoyed building my first Eduard Fw-190.  The kit is well engineered.

I purchased this directly from Eduard, it was an Overtree release.  The kit also came with photo-etch for the  A-6 and was a great deal.  The kit didn’t come with decals, I used the  H-Models #48032 Wilde Sau set which was missing the white outline from one of the numbers on one side for the aircraft I selected.   The instructions were found on the Eduard site.

I added their Brassin kit for the front of the aircraft; forward guns and engine.  I have always desired an Fw-190 with open engine hatches and the engine was a jewel and a model in itself.  My only issue (as noted in the previous post) was that the Brassin set I used was “technically” for the A-5 and I had a few issues in getting it to fit.  The bulkhead behind the engine was too narrow and the engine was too far forward requiring some adjustment on the engine mounts to bring it in closer the bulkhead.

It could just be my modeling skills.

Eduard also provides two canopies, one for closed and one for open, which is narrower.  In the real aircraft as the canopy was opened the canopy bent slightly to follow the outline of the fuselage.  I had to use the closed canopy for the open because I stepped on the closed piece getting up from the paint booth.  You can see where it sticks out a bit on the right side of the aircraft picture.

Painted with Vallejo Model Air.  These paints always seem a bit dark to me so I always lighten them up with a bit of white.  Its a bit hard to see the demarcation between the colors.

The set looked very good all painted up and in the kit, and after decaling and weathering I am happy with the completed kit!

This is most likely the final 2019 build.

Eduard Brassin for Fw-190

I am slowly progressing on the Eduard Fw-190.  One of greatest values of resin parts is the detail you can achieve without scratch modeling.  One of the greatest hassles is that everything needs to go together and sometimes the resin doesn’t quite fit.

This is the case with the Eduard Brassin set for the Fw-190.  The bulkhead under the fuselage guns is not wide enough requiring I do SOME MODELING!?  I don’t know if the issues is that I am using the Fw-190A-5 set for an Fw-190A6 but I am aware that the A-5 and A-6 had the same fuselage (the wing was redesigned for the A6).  However, I wonder how the Eduard Fw-190A5 kit stacks next to the Fw-190A6.

Anyway, some modeling was needed to extend the width of the bulkhead so that it will fit.  I confirmed before I began that the wings attach almost perfectly to the fuselage which gives me sense the kit is the right size and the resin is wrong.

BTW Eduard provides a very ingenious method to ensure the fuselage is spread correctly for the wings by using the front of the cockpit insert as a spreader.  Good job Eduard!

Previously with my DML/Dragon Fw-190s I would have to glue the upper wings to the fuselage first and then use gluing the upper to lower as a way to spread the fuselage and avoid a wing root gap.  Not the case this time!

Despite all this, the Brassin parts are very nice!

Here are some in-process shots.  The white styrene shows the difference in the width between the kit part and the brassin part.


New Fw-190 Nachtjaeger Underway

After just completing the 22 year Fw-190 build to deliver an Fw-190A8 Nachjaeger I jumped into the Eduard A-6 kit.  Although the DML Fw-190 standup quite well I am blown away by the amount of built-in detail on the Eduard kit.

I bought the Eduard kit on a special they had a few years back, purchased the kit as an Overtrees purchase and the special contained a set of pre-painted photo-etch for the cockpit.  Even though the Eduard kit has a BMW801 radial and nose guns I fell into my temptation and bought the Eduard  Brassin set for the A-5 which contains engine and guns.  The amount of detail in the Brassin set is remarkable and I first set about building these components.  Here are a few pictures of the completed engine and the rest of the set painted.

I enjoyed putting together the engine.  The way it is designed and the instructions worked quite well.  In the previous posts, I talked about building the CMK BMW 801 kit to fit the DML kit and it had a lot more that I would have had to scratch build; the Eduard Brassin has it all.

Next steps are to complete the cockpit and to start putting pieces of the kit together.

Dave